Chair Rail Ideas: Heights, Layouts & Panel Molding
26th Mar 2026
Quick answers for chair rail layouts
- Consider placement, such as a wall break, panel detail, or wainscotting cap, before selecting a suitable chair rail profile.
- When pairing chair rail molding with panel moulding, coordinate profile curvature and projection so the details read as one assembly and the shadow lines remain consistent.
- Don’t neglect details like termination points (corners, openings, and stairs) during planning and ordering.
- If you’re undertaking a large project in phases, consider matching existing trim instead of trying to force something that seems close enough.
What a chair rail does in a trim package
Chair rails began as a practical way to protect plaster walls from chair backs and everyday wear, especially in formal rooms and passageways where walls took more abuse. Over time, they became part of the visual language of interior trim, adding a horizontal break that could feel simple and understated or more decorative when paired with wainscotting and panels.
Today, chair rails are used as much for layout, proportion, and finishing detail as they are for protection. When coordinated with baseboards, crown molding, and panel moulding, chair rail molding profiles help a room feel more intentional, balanced, and complete.
Common chair rail height approaches
Before you start looking at sizes and styles, you’ll want to decide on the placement of chair rail molding, as this can impact other decisions. If you have existing panels or wainscotting, you might be locked into a specific height, but if you’re starting from scratch, you need to understand why certain heights are standard and what advantages are associated with shifting the height of the rail up or down.
Understanding the typical range
There is no single preferred height for chair rail placement. A common starting range is roughly 28 to 36 inches, with many layouts falling near 32 inches. It was originally based on factors like the height of people, the height of the room, and the height of chair backs.
Comfort in design is about more than building a space that people physically fit in. It’s also about visual perception. Furnishings should fit the room, windows should be set at a suitable height to create balance between the floor and the ceiling, and elements like wainscotting and chair rails should create a visual balance that feels proportionate to the room height and the average size of the people who will inhabit it.
Placement that suits the stature of a space
Chair rail placement depends on what the wall treatment needs to accomplish. Often, the height and size of the room are the deciding factors these days, rather than the height of your chairs. The placement may also be determined by the size of wainscotting or wall panels.
The proportions of the room should be the deciding factor because you want the placement to look and feel right. A taller, more spacious room could naturally support higher chair rail placement, but you don’t want to go too high, or you risk shortening the visual height and making the room feel confining. Lower rails are better for preserving balanced proportions in a smaller room, but they can also work well in taller rooms.
Layouts that pair well with panel moulding
Chair rail can create a defined wall break between baseboards and crown molding, and it often serves as the cap or organizing line for wainscotting and panel moulding. When installing multiple elevation features, it’s wise to plan the layout in advance to ensure it addresses both functional concerns and visual expectations.
There is more to achieving this than simply putting a cap on wainscotting or setting the height somewhere between upper and lower picture frame molding panels, for example. Placement should be thoughtful, intentional, and geared toward balance and visual appeal.
Simple wainscot frames
Whether you opt for classic flat panel, beadboard, or board and batten wainscotting, the chair rail molding you select should complement the existing elevation detail. This means the height of your wainscotting will determine where you set your chair rail, and the style and projection of wainscotting will inform the chair rail design you choose.
Multi-panel grids and spacing notes
Multi-panel grids require more coordination than a simple wainscot cap. Whether you have chair panels below the rail or panels above and below, placement should align with other elevation details. Starting from scratch gives you the opportunity to plan a sensible layout, but if the wall has existing grids, their placement will determine the height of the chair rail and how you install it for balance and visual appeal.
Chair rail molding ideas for your next project
Chair rail can organize color, texture, pattern, and circulation spaces in several distinct ways. Each idea works best when the rail height, projection, and surrounding profiles are planned as one composition.
Creating contrast with two-tone wall treatments
With two paint colors, you can have upper and lower wall sections serve distinct roles. A deep shade below the rail helps ground the room and disguise scuffs. A lighter tone above makes the room feel more open.
Chair rail height is essential here, as it also means choosing where the color break will be. The lower the division, the more space for the upper shade to promote an open feeling. Placing the rail lower also helps establish a calmer transition.
Textured panel wall treatments
Using chair rail with wainscotting can let you bring out the best in textured panels like beadboard and reeded surfaces. These panels need a finished upper edge to establish a clear boundary between the texture field and the smooth wall.
The baseboard, chair rail, and panel molding come together to form a unified lower assembly in this application. Having the same finish across the assembly emphasizes depth and shadow while remaining restrained.
Chair rail ideas for stairways and hallways
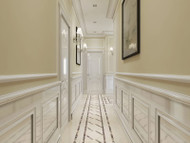
Chair rail can establish a continuous architectural line through hallways and stairways, helping narrow circulation spaces relate to the adjoining rooms.
Chair rail layout can follow the stair incline and then level out at landings. You’ll also need to consider how the trim interacts with handrails, other trim, and wall angles.
Dividing paint, wallpaper, and panel details with chair rail
Chair rail can serve as a distinct boundary between paint, wallpaper, and panel details instead of having them end abruptly. Chair rail ideas vary depending on pattern and motif. The pattern scale should influence how much open wall area remains above and below the rail. Larger motifs generally need broader fields, while smaller patterns can work within tighter sections.
Choosing profiles by style and proportion
As a finishing piece, chair rails should project beyond wainscotting, rather than being flush or recessed. How much they project and how decorative they are will depend on the style of wainscotting, the style of architecture, and personal style sensibilities. If you want the wainscotting details to remain the focus, a simpler cap often works well, while restrained paneling may support a more decorative chair rail.
As for raised panel designs like board and batten or picture frame panels, there are two things to consider with chair rail molding styles. First, do you want it to blend with other trim details or stand out? Second, you should think about the shadow it will cast, as that could make it appear to be more prominent. A more decorative or prominent design could make your chair rail a lot more visible when overhead light hits it.
Common mistakes to avoid on elevations and openings
If you were choosing trim in a vacuum, you could select whatever projection and profile details appeal to you. However, when chair rails are part of larger moulding assemblies, projection, terminations, and surrounding profiles all have to work together. Avoiding common mistakes helps preserve a cohesive appearance.
Don’t go too low or too high
Common chair rail heights provide a useful starting point, but the rail should still be checked against the actual room, furnishings, and wall layout. When wall protection is part of the goal, position the rail so chair backs are more likely to meet the moulding rather than the wall below it.
From a visual standpoint, an overly high placement can compress the upper wall area and make the room feel shorter. Use the typical range as a reference, then adjust for ceiling height, wainscotting, panel proportions, and nearby openings.
Plan the stop points first
Plan termination points before ordering or cutting the chair rail. At doors and windows, let the casing remain visually complete, then determine how the rail should stop, return, or transition based on the profile projection and surrounding trim.
The exact cut or return method depends on the casing depth, chair rail profile, and installation conditions. Confirm that detail before fabrication or installation rather than relying on a single universal treatment.
From there, you can determine how best to terminate chair rails when they reach a frame. While you could back-cut the chair rail for convenience, this isn’t the most attractive or polished finishing look. You’ll achieve the most professional appearance by butt-cutting the rail, notching it over the casing before the final cut, if necessary (depending on the elevation and profile of each element).
When matching existing profiles is the right move
Creating a custom chair rail to match existing trim is preferable in a couple of instances. First, you should explore this option if you want to preserve the original design of the interior. Even a close match could be noticeably different. A phased project can also benefit from matching profiles that ensure a cohesive look at the end.
Compare chair rail molding profiles, review panel moulding options, and request a quote if you need help coordinating an existing or phased project.